
Emails are the silent workhorses of web applications—whether it’s a password reset, a purchase receipt, or a welcome email. Ensuring these emails are sent, received, and displayed correctly is key to building trust and keeping users engaged. This guide will show you how to use Cypress and testmail.app to test your app's email functionality, making email testing a seamless part of your workflow.
Why use Cypress to test emails?
Cypress is a solid choice for email testing because it lets you automate and validate email workflows just like a real user would. You can easily simulate actions like sign-ups or password resets and verify that the right emails are sent. With real-time feedback and live browser previews, spotting and fixing issues becomes quick and efficient. And because Cypress runs on JavaScript and Node.js, it fits seamlessly into projects that already use those technologies, making setup and integration more straightforward.
By running tests directly in the browser, Cypress provides a consistent testing environment that reduces flakiness and improves reliability. Its built-in debugging tools and customizable commands make it easy to catch and resolve email issues before they reach production. Cypress is also highly flexible, allowing you to extend its capabilities with custom commands and plugins for more complex testing scenarios.
Setting up Cypress
If you're new to Cypress, this step-by-step guide will help you set it up for your project. If you haven’t installed Node.js yet, download it from nodejs.org. Installing Node.js also installs npm (Node Package Manager), which is used to manage project dependencies. Additionally, you'll need an IDE or text editor (like Visual Studio Code or Sublime Text) to write and manage your Cypress test scripts.
Pick or create a directory on your computer where you want to set up the project. Open your terminal or command prompt, navigate to your project directory, and install Cypress using the npm command:
npm install cypress
This installs Cypress as a development dependency and adds it to your package.json. Once installed, launch the Cypress Test Runner by running:
npx cypress openThis will open the Cypress GUI, which automatically creates a cypress folder in your project. Inside, you'll see directories like:
e2e/– where your end-to-end tests gofixtures/– for test datasupport/– for reusable commands and configuration
How to test emails with Cypress and testmail.app
Testmail.app offers unlimited email addresses and a robust API for email testing, enabling you to automate end-to-end tests and integrate them smoothly into your CI/CD pipelines.
- Create a testmail.app account
- Log in and copy your API key and namespace from your console
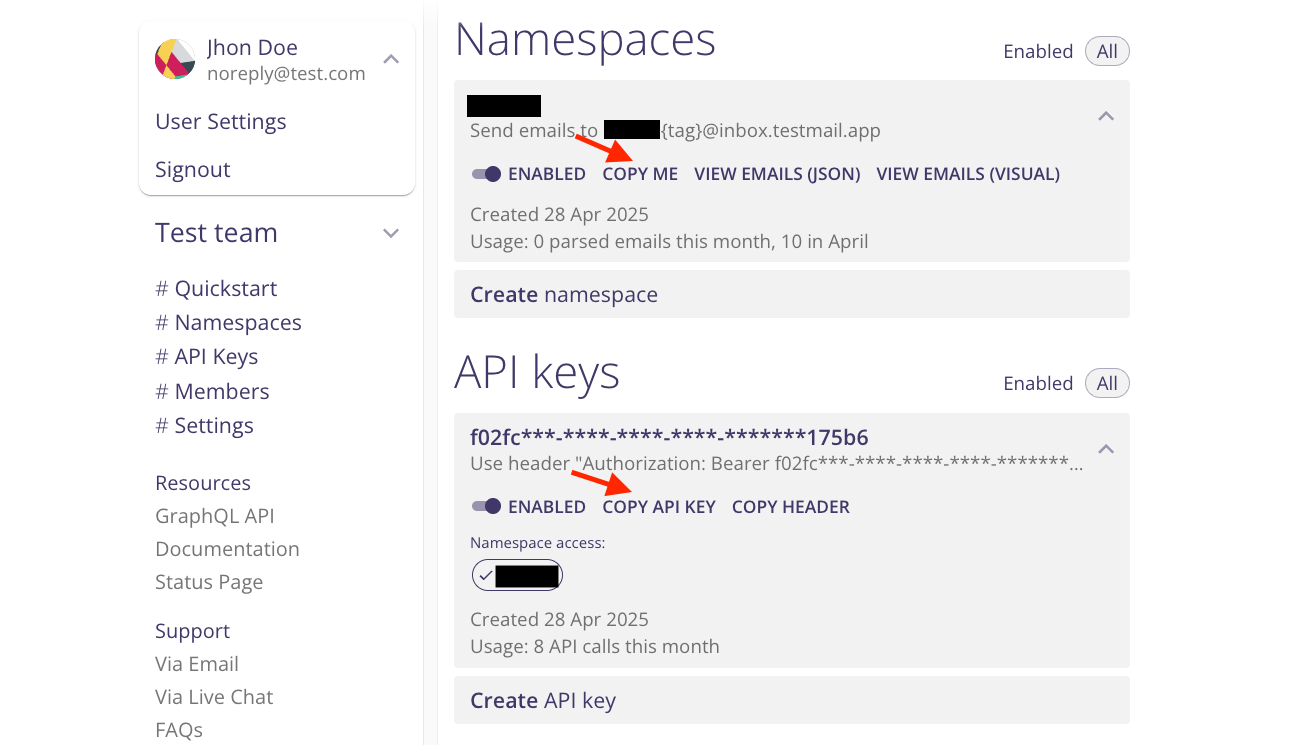
testmail.app receives emails at the address format {namespace}.{tag}@inbox.testmail.app.
Namespace: A unique identifier assigned to you, acting as a collection of mailboxes. Each namespace supports unlimited email addresses.
Tag: A customizable label that can be anything you choose. Using different tags, you can dynamically create new email addresses and mailboxes as needed.
your_namespace.*@inbox.testmail.app- Add your API key and namespace to your Cypress environment variables. Create a
cypress.env.jsonfile in the root of your project with the following content
{
    "TAG":"signup-test", // Can be any text
    "ENDPOINT":"https://api.testmail.app/api/json",
    "API_KEY":"YOUR_TESTMAIL_API_KEY", //Find yours in https://testmail.app/console after signing up
    "NAMESPACE":"YOUR_NAMESPACE"; //Find yours in https://testmail.app/console after signing up
}
testmail.app offers two APIs: a simple JSON API and a full-featured GraphQL API. (see the comparison table) The JSON API is beginner-friendly, works across all environments, and supports all HTTP clients like Axios (JavaScript), cURL, Postman, and fetch. It requires just two parameters: your API key (&apikey=YOUR_APIKEY) and namespace (&namespace=YOUR_NAMESPACE). You can also add &pretty=true to format the output for readability in a browser.
In this example, let’s use the JSON API to test the 'Welcome Aboard' email sent to users during signup. First, we’ll configure the API endpoint using your API key, tag, and namespace, which we’ll pull directly from the Cypress environment variables. Then, we’ll create a test email address using your testmail.app namespace and a customizable tag (TAG). This tag will help us group emails easily for specific tests.
// Required environment variables: ENDPOINT, APIKEY, TAG and NAMESPACE
// Replace these with your own Testmail API key and namespace in your environment configuration

// Setup our JSON API endpoint
const ENDPOINT = `${Cypress.env("ENDPOINT")}?apikey=${Cypress.env("API_KEY")}&namespace=${Cypress.env("NAMESPACE")}&tag=${Cypress.env("TAG")}`;

// Create the email address for this test
const TESTEMAIL = `${Cypress.env('NAMESPACE')}.${Cypress.env('TAG')}@inbox.testmail.app`;
Send the email
If your application involves user interaction through a signup form or similar UI, you can simulate the process to trigger the email. For instance, you could visit the signup page, fill out the form, and click the "Submit" button, which would generate the 'Welcome Aboard' email. It would look something like this:
before(() => {
  // Navigate to your app's signup page
  cy.visit('https://yourapp.com/signup');
  // Replace 'https://yourapp.com/signup' with the URL of your app's signup page

  // Fill in the email field with the test email address
  cy.get('input[name="email"]').type(TESTEMAIL);
  // Replace 'input[name="email"]' with the appropriate selector for your email input field

  // Submit the signup form to trigger the email
  cy.get('button[type="submit"]').click();
  // Replace 'button[type="submit"]' with the appropriate selector for your form's submit button
});
For simplicity, you can just open any email client and manually send an email to the test email address we created earlier.
Different types of email tests
Verify email delivery
Checking for email delivery ensures that the system reliably sends emails to users, which is critical for actions like password resets or account confirmations.
Let’s verify that the signup email is successfully delivered to the test inbox. We’ll query the inbox using the Testmail JSON API, filtering emails with the specific tag we used earlier. If the email hasn’t arrived yet, we’ll pause briefly to give it time to appear. Finally, we’ll validate that the email was delivered by checking the API response and ensuring the inbox contains exactly one email.
When you’re expecting to receive new emails, instead of repeatedly querying the inbox, add the &livequery=true parameter to your API call. “Live” queries wait until at least one email is matched before returning.
describe("Verify email delivery", () => {
  it("Should receive the email", () => {
    // Query the inbox until the email arrives
    cy.request("GET", `${ENDPOINT}&livequery=true`).then((response) => {
      const inbox = response.body;
      cy.wrap(response.status)
        .should("be.oneOf", [200, 307])
        .then((status) => {
          if (status === 307) {
            cy.wait(5000); // Wait for 5 seconds before rechecking
          }
        }); // Check if the response status is 200 or 307
      cy.wrap(inbox.result).should("equal", "success"); // Check if the inbox result is success
    });
  });
});
The expected result is a "success" response with one email in the inbox, confirming the email was delivered as expected.
Validate email content
Test basic properties: Verifying the sender, subject line, and timestamp helps confirm that the email is legitimate and sent at the right moment. It prevents issues like emails appearing to come from the wrong address or having incorrect timestamps, which can confuse recipients.
Here, we verify that the sender, subject, and content match the expected values.
describe("Validate Email Content", () => {
  it("should verify sender, subject, and email body", () => {
    cy.request("GET", `${ENDPOINT}&livequery=true`).then((response) => {
      const email = response.body.emails[0];

      // Verify sender and subject
      cy.wrap(email.from).should("equal", "[email protected]"); // Replace with your app's sender email
      cy.wrap(email.subject).should("equal", "Welcome aboard!"); // Replace with the expected email subject

      // Extract and check email content
      const parser = new DOMParser();
      const doc = parser.parseFromString(email.html, "text/html");

      cy.wrap(doc.getElementsByTagName("h1").length).should(
        "be.greaterThan",
        0
      ); // There should be at least one h1 tag

      expect(doc.getElementsByTagName("h1")[0].innerText).to.satisfy((text) =>
        text.includes("Welcome aboard!")
      ); // The first h1 tag should have the text "Welcome aboard!"
    });
  });
});
Test links
- Check for broken links: Ensures all links work as expected, which is vital for user engagement. Broken links can lead to a poor user experience and reduce trust in your communication.
describe("Checking for Broken Links", () => {
  it("should verify that all links in the email are working", () => {
    cy.request("GET", `${ENDPOINT}&livequery=true`).then((response) => {
      const email = response.body.emails[0]; // Use the API response to get the email data
      const parser = new DOMParser();

      const root = parser.parseFromString(email.html, "text/html"); // Parse the email's HTML content

      const links = root.querySelectorAll("a"); // Find all links in the email

      // Log if no links are found
      if (links.length === 0) {
        cy.log("No links found in the email.");
      }

      // Check each link's response status
      links.forEach((link) => {
        const href = link.getAttribute("href")?.slice(1, -1); // Get the link's URL

        if (href && href.startsWith("http")) {
          // Check if the link is a valid HTTP URL
          cy.request({
            url: href, // Replace with the link to test
            failOnStatusCode: false, // Prevent test from failing immediately on bad status
          }).then((resp) => {
            if (resp.status !== 200) {
              cy.log(`Broken link detected: ${href} (Status: ${resp.status})`); // Log broken links
            } else {
              cy.log(`Valid link: ${href}`); // Log valid links
            }
            expect(resp.status, `Link check for ${href}`).to.eq(200); // Assert that the link is valid (status 200)
          });
        } else {
          cy.log(`Skipped invalid or relative link: ${href}`); // Log skipped links if they're invalid or relative
        }
      });
    });
  });
});- Navigating and clicking links: Simulating a user's interaction with links helps ensure the entire email journey—from clicking to landing on the correct page—functions smoothly, which is key for conversions and user satisfaction.
describe("Navigating and Clicking Links", () => {
  it("should navigate to the verification link and check the confirmation page", () => {
    cy.request("GET", `${ENDPOINT}&livequery=true`).then((response) => {
      const email = response.body.emails[0]; // Get the first email from the response data

      const parser = new DOMParser();
      const root = parser.parseFromString(email.html, "text/html");
      const linkElement = root.querySelector("#verifyemail"); // Replace #verifyemail with relevant selector

      // Ensure the verification link exists
      expect(linkElement, "Verification link exists in the email").to.not.be
        .null;

      const link = linkElement.getAttribute("href");

      // Verify the link is valid before visiting
      expect(link, "Verification link URL").to.match(/^https?:\/\//);

      // Visit the verification link
      cy.visit(link);

      // Confirm the verification message appears
      cy.contains("Your email has been verified").should("be.visible"); // Replace with the actual confirmation message expected
    });
  });
});
Test for spam triggers
Generally, you don’t have to worry about spam filters if:
- Your emails are genuinely relevant and not spammy.
- You have correctly configured DKIM and SPF.
- Your domain, email servers, and IPs have good reputations (they are not on blacklists).
To help you improve deliverability, we spam-test every email and attach spam scores and detailed spam reports that you can query via API.
Testmail.app uses SpamAssassin (the most popular open-source anti-spam platform) to spam-test emails. Spam scores and reports generated by SpamAssassin are not “universal” - they are highly dependent on the enabled rule sets and plugins.
TL;DR
- Don’t worry about spam scores below 5.
- If the spam score exceeds 5: look at which rules were triggered in the spam_report and fix the problems with the greatest impact.
- Negative spam scores are possible (a good thing).
describe("Checking Spam Score", () => {
  it("should check the spam score and log triggered rules", () => {
    // Include spam_report=true in the API call
    cy.request("GET", `${ENDPOINT}&liveQuery=true&spam_report=true`).then(
      (response) => {
        const email = response.body.emails[0];
        // Log the spam score
        const spamScore = email.spam_score;

        cy.log(`Spam Score: ${spamScore}`);

        // If spam score exceeds 5, log the triggered rules
        if (spamScore > 5) {
          cy.log("High spam score detected! Investigate the following issues:");
          cy.log(email.spam_report);
        } else {
          cy.log("Spam score is within acceptable limits.");
        }

        // Assert spam score is below 5
        expect(spamScore).to.be.lessThan(5);
      }
    );
  });
});
Test email rendering
Validating email rendering ensures your emails look great across different devices and email clients, which is essential for maintaining brand consistency and providing a positive user experience. Here’s how you can test email rendering on mobile devices by setting the viewport and capturing a screenshot:
describe("Email Rendering on Mobile", () => {
  it("should render the email correctly on mobile view", () => {
    cy.request(`${ENDPOINT}&liveQuery=true`).then((response) => {
      const email = response.body.emails[0];

      // Save the email HTML content to a file for rendering in Cypress
      cy.writeFile("cypress/fixtures/email.html", email.html);

      // Set the viewport to mobile size (iPhone 8 dimensions in this case)
      cy.viewport(375, 667); // Replace with your desired mobile device dimensions if needed

      // Visit the saved email HTML file in the Cypress fixtures folder
      cy.visit("cypress/fixtures/email.html");

      // Wait for the content to load fully
      cy.wait(1000); // Adjust this wait time if needed based on the email's load time

      // Capture a screenshot of the email body on mobile view for verification
      cy.get("body").screenshot("email-mobile-view"); // Change screenshot name if necessary
    });
  });
});
Test email attachments
Ensure that any files attached to the email are correctly included and can be accessed by the recipient, preventing issues like missing documents or corrupted files.
describe("Handling Email Attachments", () => {
  it("should verify attachments are downloadable", () => {
    cy.request(`${ENDPOINT}`).then((response) => {
      const email = response.body.emails[0];
      const attachment = email.attachments[0];

      expect(attachment).to.exist;

      cy.request({
        url: attachment.downloadUrl,
        encoding: "binary",
      }).then((resp) => {
        expect(resp.status).to.equal(200);
        expect(resp.body.length).to.be.greaterThan(0); // Ensure file isn't empty
      });
    });
  });
});
Test images and web beacons
Testing images and web beacons ensures that visual elements and tracking tools in your emails display correctly and function as expected. By validating these components, you can confirm that your email metrics are accurately captured and ensure that emails are visually appealing.
describe("Testing Images and Web Beacons", () => {
  it("should verify images and web beacons load correctly", () => {
    cy.request(`${ENDPOINT}`).then((response) => {
      const email = response.body.emails[0];
      const parser = new DOMParser();
      const root = parser.parseFromString(email.html, "text/html");

      // Verify all images load correctly
      root.querySelectorAll("img").forEach((img) => {
        cy.request(img.getAttribute("src")).its("status").should("eq", 200);
      });

      // Verify web beacon loads correctly (specific tracking pixel)
      const beacon = root.querySelector('img[alt="tracking pixel"]');
      if (beacon) {
        cy.request(beacon.getAttribute("src")).its("status").should("eq", 200);
      }
    });
  });
});


